
 Pin it
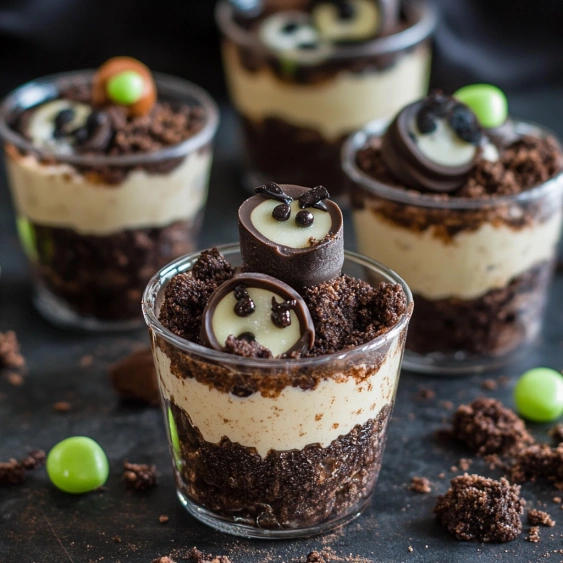
This dirt pudding cup recipe transforms ordinary ingredients into a spooky Halloween treat that delights both kids and adults. The combination of creamy chocolate pudding and crunchy cookie "dirt" creates the perfect base for monster decorations and candy surprises. I've been making these for Halloween parties for years, and they always disappear within minutes!
I first created these for my son's kindergarten Halloween party when I forgot about the signup until the night before. They were such a hit that the room parents requested them again every year until he graduated elementary school!
Ingredients
- Oreo cookies: create the realistic dirt effect with their dark color and crunchy texture
- Instant chocolate pudding mix: provides the quick creamy base without cooking
- Cold milk: activates the pudding ensuring proper thickness
- Cool Whip: lightens the pudding texture creating a mousse like consistency
- Chocolate sprinkles: add extra dirt like texture to the top layer
- Halloween toppings: like monster cookies and gummy worms bring the spooky theme to life
Step-by-Step Instructions
- Prepare the Dirt:
- Crush Oreo cookies thoroughly until they resemble fine soil. The finer the crumbs, the more realistic your dirt will look. A food processor works fastest, but placing cookies in a sealed bag and crushing with a rolling pin works perfectly too. Make sure to crush the entire cookie, cream filling included, as this helps bind the crumbs together slightly.
- Mix the Pudding Base:
- Whisk the chocolate pudding mix with cold milk until completely smooth with no powder lumps remaining. The cold milk is crucial here as warm milk will prevent proper setting. Allow the mixture to rest in the refrigerator for exactly 5 10 minutes. This partial setting creates the perfect consistency for the next step.
- Create the Mousse:
- Gently fold the thawed Cool Whip into the slightly set pudding. Use a rubber spatula and fold with an under and over motion rather than stirring to maintain the airiness. The mixture should be uniform in color with no white streaks remaining. This mousse like texture makes the perfect contrast to the crunchy cookie dirt.
- Layer the Components:
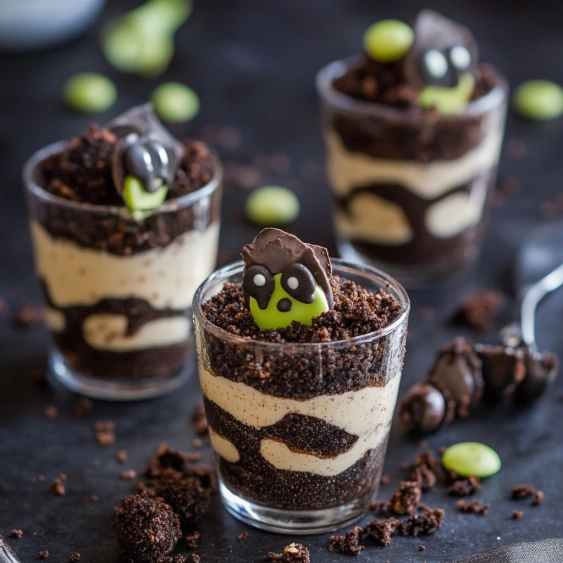
- Begin with a foundation layer of cookie dirt approximately one inch deep. Follow with a generous layer of chocolate mousse about twice as thick as the cookie layer. Add another thin dirt layer followed by a final mousse layer, leaving enough room at the top for decorations. The layering creates visual interest when served in clear cups.
- Add the Final Touches:
- Cover the top completely with cookie crumbs and chocolate sprinkles to create the garden soil effect. Press monster cookies and gummy worms partially into the dirt so they appear to be emerging from underground. Refrigerate for at least one hour to allow flavors to meld and texture to set properly.
 Pin it
The gummy worms are my secret favorite part of this dessert. I discovered their perfect texture contrast to the creamy pudding and crunchy cookies when my daughter insisted we add them to our first batch. Now I always keep extra to nibble on while we assemble these treats!
Make Ahead Options
These dirt pudding cups can be prepared up to one day before serving. Simply assemble completely, cover with plastic wrap, and refrigerate. The cookie layers will soften slightly, creating an almost cake like texture that many people prefer. Add any delicate decorations like monster cookies just before serving to prevent them from becoming soggy.
Serving Suggestions
For maximum impact, serve these dirt pudding cups on a tray decorated with additional gummy worms, plastic spiders, or scattered cookie crumbs. Small garden shovels or plastic spoons decorated with Halloween stickers make perfect serving utensils. Consider serving alongside warm apple cider for a complete fall treat experience that balances the cold creaminess of the pudding.
 Pin it
Dietary Adaptations
This recipe can be easily modified for various dietary needs. For dairy sensitivities, use dairy free pudding mix with almond or oat milk and dairy free whipped topping. Gluten free chocolate sandwich cookies work perfectly for those avoiding gluten. The beauty of this recipe is its flexibility while maintaining the fun dirt and worms concept that everyone enjoys.
Frequently Asked Questions
- → Can I make dirt pudding cups ahead of time?
Yes, you can prepare dirt pudding cups up to 24 hours in advance. Keep them refrigerated and add any cookie decorations or gummy worms shortly before serving to maintain their appearance.
- → What can I use instead of Cool Whip?
Freshly whipped cream makes an excellent substitute for Cool Whip. Simply beat 1 cup of heavy whipping cream until stiff peaks form, then fold it into the pudding mixture.
- → Are there any dairy-free alternatives for this dessert?
Yes! Use dairy-free pudding mix with almond or coconut milk, and dairy-free whipped topping. Most Oreos are actually dairy-free (check packaging), making this easy to adapt.
- → What serving containers work best for dirt pudding cups?
Clear plastic cups or small mason jars work best as they showcase the beautiful layers. For Halloween parties, small plastic flower pots or cauldrons add a festive touch.
- → How can I make this dessert more appropriate for adults?
For a more sophisticated version, use higher quality chocolate pudding, add a layer of chocolate ganache, and serve in elegant glassware. Consider adding a splash of coffee liqueur to the pudding mixture.
- → Can I use regular pudding instead of instant pudding?
While instant pudding is recommended for its quick setting properties, you can use regular pudding if you prepare it according to package directions and let it cool completely before assembling the cups.