
 Pin it
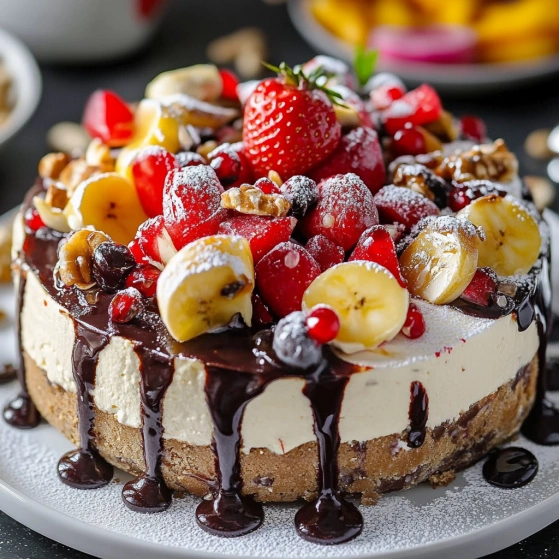
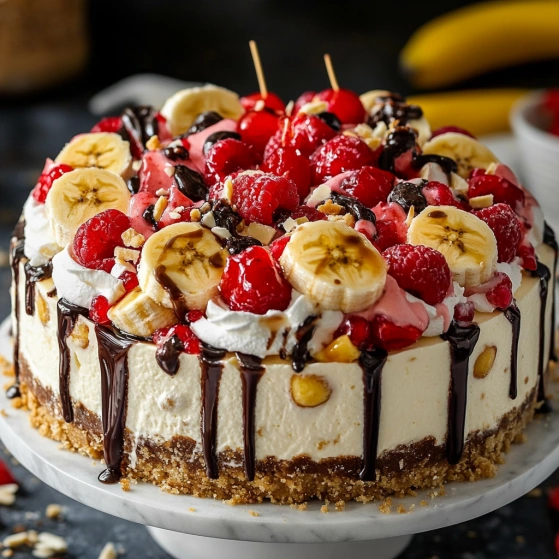
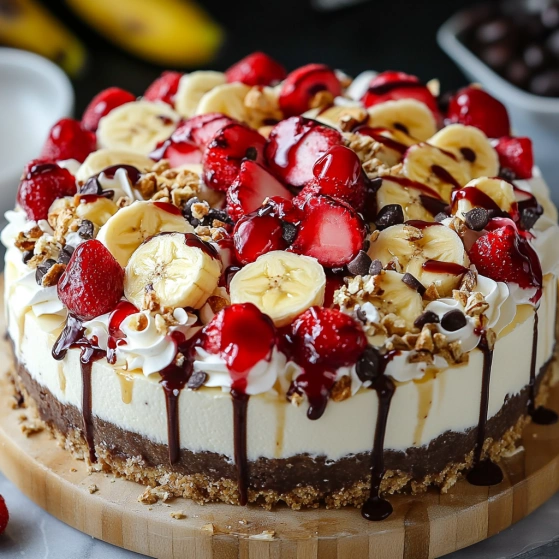
This No-Bake Banana Split Cheesecake transforms the classic ice cream treat into a luscious, creamy dessert that requires zero oven time. The combination of smooth cream cheese, fresh bananas, sweet pineapple, and cherries creates layers of flavor that perfectly capture the essence of a traditional banana split. It's an ideal make-ahead dessert for summer gatherings when you don't want to heat up the kitchen, yet still crave something indulgent and impressive.
I made this for my sister's birthday last July when temperatures soared past 95 degrees. Nobody missed having traditional cake, and I didn't have to suffer through baking in the heat. The empty dish and multiple recipe requests confirmed it was the right choice!
Ingredients and Selection Tips
- Graham cracker crumbs: Creates the perfect cookie-like base. For extra flavor, try chocolate graham crackers or even crushed vanilla wafers.
- Granulated sugar: Sweetens and helps bind the crust. Brown sugar works too if you prefer a deeper molasses flavor.
- Unsalted butter: Binds the crust together. Make sure it's fully melted for proper distribution.
- Cream cheese: The star of the filling. Allow to soften properly at room temperature for at least 1 hour to avoid lumps.
- Powdered sugar: Dissolves seamlessly into the filling for a smooth texture. Don't substitute granulated here.
- Vanilla extract: Pure rather than imitation makes a noticeable difference in flavor depth.
- Whipped topping: Lightens the cream cheese mixture. You can substitute homemade whipped cream stabilized with a bit of gelatin if preferred.
- Bananas: Choose ripe but still firm bananas with minimal brown spots for the best flavor and texture.
- Crushed pineapple: The acidity balances the richness of the cream cheese. Drain thoroughly to prevent a soggy dessert.
- Maraschino cherries: Provides that classic banana split pop of color and flavor. Pat dry before adding.
- Chocolate and caramel syrups: Brings the sundae experience to the cheesecake. Quality brands make a difference here.
Step-by-Step Instructions
- 1. Create the Perfect Crust
- Pour your graham cracker crumbs into a medium mixing bowl. Add the granulated sugar and stir to combine these dry ingredients evenly. Drizzle in the melted butter while stirring with a fork until the mixture resembles wet sand. You'll know it's ready when a handful squeezed together holds its shape. Transfer this mixture to a 9×9-inch baking dish and press firmly using the bottom of a measuring cup, working from the center outward and slightly up the sides. Place in the refrigerator while preparing the filling.
- 2. Prepare the Silky Cheesecake Filling
- In a large bowl, add the softened cream cheese and beat with an electric mixer on medium speed for about 2 minutes until completely smooth. Scrape down the sides of the bowl at least once during mixing. Add the powdered sugar in two additions, beating well after each. Mix in the vanilla extract until just incorporated. Now, using a rubber spatula, gently fold in the whipped topping with a light hand using a figure-eight motion. Continue folding until no white streaks remain, being careful not to deflate the mixture.
- 3. Begin Building Layers
- Take your chilled crust from the refrigerator. Using an offset spatula, spread exactly half of your cream cheese mixture over the crust in an even layer, making sure to reach the corners. Take your time here - an even layer creates better-looking slices. Arrange banana slices in a single layer over the cream cheese, slightly overlapping them. Evenly distribute the drained crushed pineapple over the bananas, gently pressing down. Place maraschino cherry halves across the surface, spacing them so each future slice will contain at least one cherry.
- 4. Complete the Layering Process
- Carefully spread the remaining cream cheese mixture over the fruit layer using your offset spatula. Start from the center and work outward with gentle strokes to avoid disturbing the fruit beneath. For the finishing touch, drizzle the chocolate syrup in parallel lines across the surface, then repeat in the perpendicular direction with the caramel sauce. For a more artistic presentation, use a toothpick to gently swirl the sauces together in places without overmixing.
- 5. Chill Thoroughly
- Cover the dessert with plastic wrap, being careful not to let it touch the surface. Refrigerate for a minimum of 4 hours, though overnight is preferable for the flavors to fully develop and the dessert to set completely. The waiting is the hardest part but absolutely necessary for proper texture and clean slices.
- 6. Present and Serve
- Just before serving, remove from refrigerator and add final garnishes. Pipe whipped cream rosettes around the edges using a star tip. Place additional banana slices (dipped in lemon juice to prevent browning) between the rosettes. Top each whipped cream portion with a whole maraschino cherry and sprinkle chocolate shavings or pieces across the center. Slice with a sharp knife dipped in hot water between cuts for the cleanest presentation.
 Pin it
My grandmother always said bananas were nature's perfect food, and she'd sneak them into everything she could. She lived to 96 and swore her daily banana kept her regular and energetic. While I can't promise this cheesecake will extend your life, I can say it honors her memory every time I make it, especially when my kids fight over the last piece.
Perfect Make-Ahead Dessert
No-bake cheesecakes are the ultimate stress-reducer for entertaining. I've made this dessert up to two days before a party with excellent results. The key is to add the final garnishes just before serving. The flavors actually improve after a day in the refrigerator as they meld together, creating a more cohesive taste experience. For summer gatherings especially, having a show-stopping dessert already prepared gives you more time to enjoy your guests rather than sweating in the kitchen during the party.
Customizing Your Banana Split Cheesecake
This recipe welcomes personalization based on your favorite banana split toppings. Try adding crushed nuts like peanuts or walnuts between the layers for added crunch and protein. For chocolate lovers, mix mini chocolate chips into the cream cheese filling or substitute a chocolate cookie crust. You can even experiment with different fruit combinations – strawberries work beautifully in place of or alongside the cherries. The beauty of this recipe is its flexibility while still maintaining that nostalgic banana split experience we all cherish.
 Pin it
Serving Suggestions for Special Occasions
Transform this casual dessert into a sophisticated ending for dinner parties by changing the presentation. Instead of making one large cheesecake, prepare individual servings in glass tumblers or mason jars for an elegant, portioned dessert. Layer the ingredients as directed, but create a visual display through the glass. For holiday gatherings, adjust the garnishes to suit the season – crushed peppermint candies at Christmas or fresh berries for Fourth of July celebrations. Serving with additional warm chocolate or caramel sauce on the side allows guests to add that final touch of indulgence themselves, making the experience interactive and memorable.
Frequently Asked Questions
- → Can I use a different type of crust?
Yes, you can use a pre-made graham cracker crust or substitute with crushed cookies like Oreos or digestive biscuits for a unique flavor.
- → How do I prevent the bananas from browning?
To prevent browning, you can toss the banana slices in a little bit of lemon juice before layering them. This helps maintain their fresh appearance.
- → Can I make this dessert ahead of time?
Absolutely! You can prepare it a day in advance and store it in the refrigerator. Just add the garnishes right before serving for the best presentation.
- → Can I use frozen fruit for the layers?
While fresh fruit is recommended for the best texture, you can use thawed frozen fruit. Be sure to drain any excess liquid to avoid making the layers too wet.
- → How do I store leftovers?
Cover the dish tightly with plastic wrap or aluminum foil and store it in the refrigerator for up to 3 days. This will help preserve freshness and keep the bananas from browning too quickly.