
 Pin it
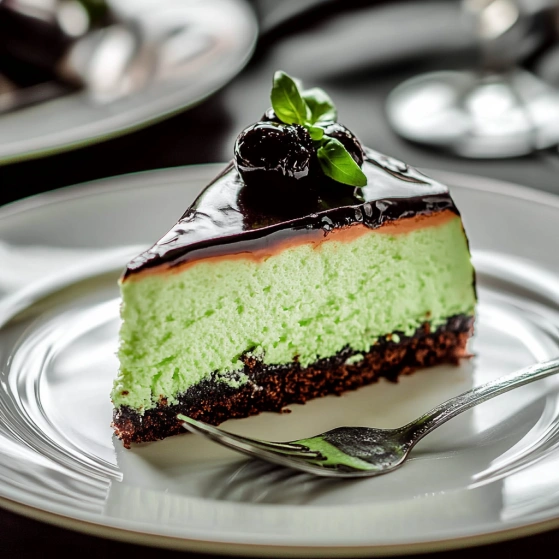
This mint chocolate cheesecake combines the classic pairing of cool mint and rich chocolate into a decadent dessert that's perfect for special occasions. The layers of creamy mint-infused cheesecake, surprise Oreo chunks, and chocolate ganache create a stunning visual and flavor experience. The hint of peppermint extract gives just the right amount of freshness without overpowering the richness of the cream cheese and chocolate components.
I first made this for my sister's birthday when she requested "something with mint chocolate," and it's become our family's most requested special occasion dessert. The contrast between the cool mint filling and the rich chocolate elements creates something truly magical.
Ingredients
- Oreos (32 total): The cookies provide the perfect chocolatey base and hidden layer. Use regular, not double-stuffed, for the best texture in the crust.
- Unsalted butter: Binds the crust together. Make sure it's fully melted but not too hot when mixing with the crumbs.
- Cream cheese (32 oz): The foundation of any good cheesecake. Must be full-fat and completely room temperature to avoid lumps.
- Granulated sugar: Balances the tanginess of the cream cheese without making it overly sweet.
- Sour cream: Adds moisture and a subtle tang that makes the texture silkier. Again, full-fat is crucial.
- Vanilla extract: Provides depth of flavor that complements both the mint and chocolate.
- Peppermint extract: The star flavor - be careful not to overdo it as it can quickly become overwhelming.
- Green gel food coloring: Creates the visual cue for mint flavor. Gel works better than liquid for maintaining proper consistency.
- Eggs: Act as the binding agent. Room temperature eggs incorporate more smoothly into the batter.
- Hot fudge sauce: Creates both the chocolate drizzle for the hidden Oreo layer and the glossy topping. A good quality store-bought works perfectly.
- Whipped cream (optional): Adds a light, billowy contrast to the dense cheesecake.
Step-by-Step Instructions
- Step 1:
- Begin by preheating your oven to 325°F. Spray a 9-inch springform pan with nonstick spray, making sure to coat the sides well. Process 20 Oreos in a food processor until they're fine crumbs - no large chunks should remain. Transfer these crumbs to a bowl and pour in your melted butter, mixing until every crumb is moistened. The mixture should hold together when pressed between your fingers but shouldn't feel overly greasy. Press this mixture firmly into the bottom of your pan using the flat bottom of a measuring cup, creating an even layer. Bake for exactly 8 minutes, then remove and place on a cooling rack while you continue with the next steps.
- Step 2:
- Coarsely chop the remaining 12 Oreos - you want visible chunks, not tiny pieces. Place them in a bowl and set aside. Warm your hot fudge sauce just enough to make it pourable, about 10-15 seconds in the microwave, stirring halfway through. Be careful not to overheat it. Stir the peppermint extract directly into the warm sauce, ensuring it's evenly distributed. Pour this minty chocolate mixture over your chopped Oreos and gently fold until every piece is coated. This mixture will create a delightful surprise texture contrast in your finished cheesecake.
- Step 3:
- This step requires patience for the perfect texture. In your mixer bowl, beat the completely softened cream cheese on medium-high speed for a full 2 minutes until no lumps remain. Add the granulated sugar and continue beating for another 2 minutes until the mixture looks light and fluffy. Reduce your mixer speed to low - this is crucial to prevent incorporating too much air. Add your room temperature sour cream, vanilla extract, peppermint extract, and just enough green food coloring to achieve a soft mint color. Mix until these ingredients are fully incorporated, stopping to scrape down the sides and bottom of the bowl at least once.
- Step 4:
- With your mixer still on low speed, add eggs one at a time, allowing each to barely incorporate before adding the next. This prevents overmixing which can cause cracks. After all eggs are added, use a silicone spatula to give the batter a final fold, making sure to scrape the bottom and sides of the bowl. Pour about one-third of this batter into your prepared crust. Next, carefully distribute your Oreo-fudge mixture evenly across this layer. Try to spread it relatively evenly but don't stress about perfect distribution. Gently pour the remaining cheesecake batter over top, using your spatula to create a smooth surface.
- Step 5:
- A water bath is essential for even baking and preventing cracks. Place your springform pan inside a slightly larger round pan, then place both inside an even larger pan or roasting dish. Fill the outermost pan with hot water until it reaches halfway up the sides of the middle pan. Carefully transfer this entire setup to your preheated oven. Bake for 1 hour and 20-45 minutes - the center 2 inches should still have a slight jiggle when gently shaken. For absolute certainty, use an instant-read thermometer to check that the internal temperature has reached 145°F.
- Step 6:
- Turn off your oven but leave the cheesecake inside with the door closed for one full hour. This gradual cooling prevents the dramatic temperature change that can cause cracks. After an hour, remove the springform pan from the water bath setup and place it on a cooling rack for an additional two hours at room temperature. Once completely cool, cover the cheesecake with plastic wrap or aluminum foil and refrigerate for at least 6 hours, preferably overnight. Patience with proper cooling is what separates good cheesecakes from great ones.
- Step 7:
- When ready to serve, run a thin knife or offset spatula around the edge of the pan before releasing the springform ring. Gently warm your hot fudge sauce until it's just pourable but not hot. Pour it onto the center of your chilled cheesecake, then use an offset spatula to spread it toward the edges, allowing some to artfully drip down the sides if desired. You can serve immediately or return it to the refrigerator to set the topping, depending on your preference. If using whipped cream, add it just before serving.
 Pin it
My grandmother always insisted mint aids digestion, which might explain why I feel less guilty enjoying a slice after a big family dinner. Something about the cooling sensation of mint combined with the richness of chocolate creates the perfect ending to a meal. When I serve this at gatherings, it's always the first dessert to disappear completely.
The Science Behind Cheesecake Success
The perfect cheesecake texture depends heavily on understanding the role of proteins and fats. Room temperature ingredients aren't just a suggestion - they're essential because cold cream cheese simply cannot incorporate properly with other ingredients, leading to a lumpy batter. The gentle mixing after adding eggs prevents incorporating too much air, which would cause the cheesecake to rise dramatically in the oven, then collapse and crack during cooling. The water bath provides consistent, moderate heat distribution by regulating the temperature around the pan, ensuring the eggs coagulate slowly and evenly throughout the entire cheesecake.
Seasonal Variations to Consider
This mint chocolate cheesecake can be adapted throughout the year to highlight seasonal flavors. During the holidays, add some crushed candy canes to the topping for a festive touch and extra minty crunch. In summer, consider adding a layer of fresh raspberries between the Oreo mixture and top cheesecake layer, as raspberry pairs beautifully with both mint and chocolate. For fall gatherings, you might replace the mint with orange extract and add a teaspoon of cinnamon to the crust for a spiced chocolate orange variation that complements autumn meals perfectly.
 Pin it
Troubleshooting Common Cheesecake Problems
Even experienced bakers occasionally encounter issues with cheesecakes, but most problems have simple solutions. If your cheesecake develops cracks despite following all precautions, don't worry - the chocolate topping will cover them completely. If your crust seems too crumbly when serving, you likely needed a bit more butter to bind it; next time, test the mixture by pressing it between your fingers before baking. Overly dense texture usually results from overmixing, particularly after adding eggs, so be especially gentle during this stage. If your cheesecake seems too soft in the center after cooling, it likely needed a few more minutes in the oven; remember that the target internal temperature is 145°F for food safety and optimal texture.
Frequently Asked Questions
- → How can I make the crust firm?
Press the Oreo mixture firmly into the pan and bake for 8 minutes. This ensures it holds together well once the cheesecake is assembled.
- → Can I use light cream cheese?
Full-fat cream cheese is recommended for the best texture, but you can use light cream cheese if needed. Keep in mind the cheesecake may be slightly less creamy.
- → What does the peppermint extract add?
The peppermint extract provides a refreshing, minty flavor that beautifully complements the rich chocolate and creamy filling.
- → How do I avoid cracks in the cheesecake?
Bake the cheesecake in a water bath, avoid over-mixing the batter after adding eggs, and cool it gradually in the oven before refrigerating.
- → Can I freeze the cheesecake?
Yes! Before adding the fudge topping, wrap the cheesecake tightly and freeze for up to 3 months. Thaw in the refrigerator overnight before serving.
- → Is the green color necessary?
The green gel food coloring is optional and only adds a festive minty appearance. Omit it if you prefer a natural cream color.