
 Pin it
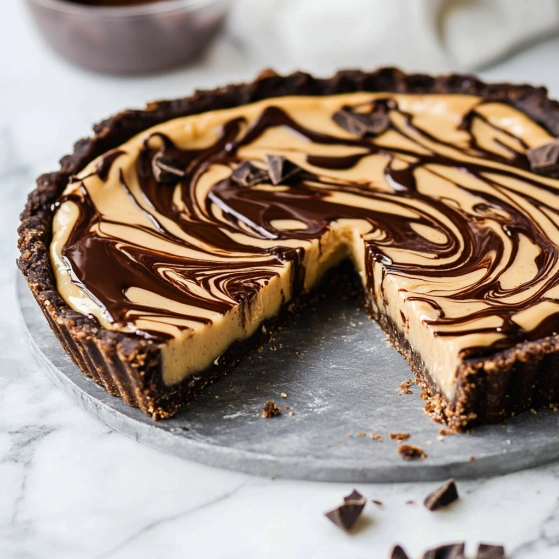
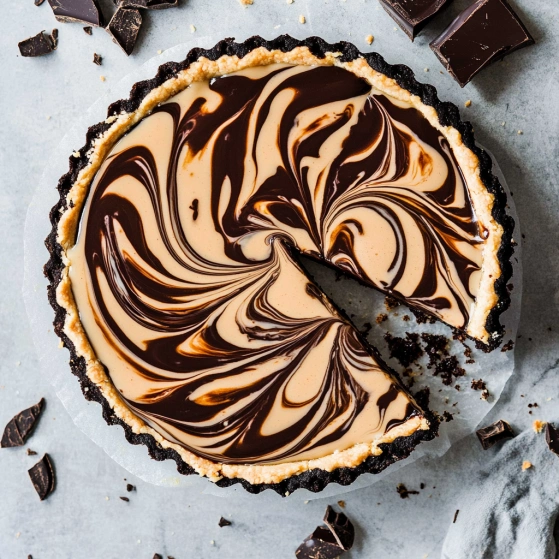
This chocolate peanut butter swirl tart combines two irresistible flavors in one elegant dessert. The crisp chocolate cookie crust supports layers of silky chocolate ganache and fluffy peanut butter mousse, finished with artistic chocolate swirls that make this showstopper as beautiful as it is delicious.
I first created this tart for my husband's birthday when he couldn't decide between chocolate or peanut butter dessert. The combination was such a hit that it's now requested at every family gathering and holiday celebration.
Ingredients
- Chocolate sandwich cookies: provide the perfect crunchy base with built-in chocolate flavor
- Unsalted butter: helps bind the crust and adds richness
- Semi-sweet chocolate chips: create a smooth ganache layer without being overly sweet
- Heavy whipping cream: adds luxurious texture to both the ganache and mousse
- Cream cheese: stabilizes the peanut butter filling and adds tanginess
- Creamy peanut butter: brings the signature nutty flavor; use natural varieties for best results
- Powdered sugar: sweetens without grittiness
- Vanilla extract: enhances both chocolate and peanut butter layers
- Chocolate syrup: creates the beautiful marbled effect on top
Step-by-Step Instructions
- Prepare the crust:
- Process chocolate sandwich cookies into fine crumbs in a food processor. Add melted butter and pulse until the mixture resembles wet sand that holds together when pressed. Transfer to a 9½ inch tart pan, pressing firmly and evenly across the bottom and up the sides. Use a measuring cup to compact the crust and create smooth edges. Refrigerate while preparing the next layer.
- Create the ganache:
- Place chocolate chips in a heatproof bowl. Heat cream in a small saucepan until it just begins to simmer with tiny bubbles forming around the edges but not boiling vigorously. Pour hot cream over chocolate and cover with foil. Let sit undisturbed for 5 minutes to allow the chocolate to melt gently. Whisk slowly from the center outward until completely smooth and glossy. Add vanilla extract and mix until incorporated.
- Layer the ganache:
- Pour the warm ganache over the chilled crust, using an offset spatula to spread it into an even layer reaching all the way to the edges. The ganache should be smooth and level. Place in freezer for 15 minutes to set quickly while preparing the filling.
- Whip the cream:
- In a chilled metal bowl, whip the heavy cream until soft peaks form when the beater is lifted. The cream should hold its shape but still have a slightly soft texture. Refrigerate until ready to use.
- Make peanut butter mixture:
- Beat cream cheese until completely smooth with no lumps. Add peanut butter, sifted powdered sugar, and vanilla, mixing until perfectly incorporated and silky. The mixture should be uniform in color with no streaks.
- Combine with whipped cream:
- Gently fold half the whipped cream into the peanut butter mixture using a spatula, cutting down through the center and folding over the sides with a turning motion. Add remaining whipped cream and continue folding until no white streaks remain. The filling should be light and mousse-like.
- Assemble and swirl:
- Spoon the peanut butter filling onto the set ganache layer, spreading evenly to the edges. Drizzle chocolate syrup in lines across the surface, then drag a knife or skewer through to create elegant swirls. Work quickly but gently to maintain the distinct layers.
- Chill and serve:
- Refrigerate the assembled tart for at least 2 hours or overnight to fully set. For clean slices, run a sharp knife under hot water, wipe dry, and cut with a straight downward motion.
 Pin it
The quality of your peanut butter makes all the difference in this recipe. I once tried making this with natural peanut butter that had separated, and the filling never achieved that perfect silky texture. Now I always use a commercial creamy variety like Jif or Skippy for consistently excellent results.
Make Ahead Tips
This tart is perfect for preparing in advance of special occasions. You can make the entire dessert up to three days before serving and keep it refrigerated. The flavors actually develop and improve with a day of resting, making the chocolate and peanut butter notes more pronounced. For the freshest presentation, add the chocolate drizzle and swirls just a few hours before serving.
Serving Suggestions
The rich flavors of this tart pair beautifully with a scoop of vanilla ice cream or a dollop of lightly sweetened whipped cream. For an extra special presentation, garnish with chopped roasted peanuts, chocolate shavings, or a light dusting of cocoa powder. Serve chilled but remove from the refrigerator about 10 minutes before eating to allow the ganache to soften slightly for the perfect texture.
 Pin it
Perfect Substitutions
If you prefer a different nut butter, almond or cashew butter can be substituted for the peanut butter, though each will impart its own unique flavor profile. For a gluten-free version, use gluten-free chocolate sandwich cookies for the crust. If you want a deeper chocolate flavor, dark chocolate chips can replace the semi-sweet in the ganache layer. When cream cheese isn't available, mascarpone makes an excellent substitute that adds an even more luxurious texture.
Frequently Asked Questions
- → Can I make this tart ahead of time?
Yes! This tart is perfect for making ahead. You can prepare it up to 2 days in advance and store it covered in the refrigerator. For longer storage, it can be frozen for up to 1 month - just thaw in the refrigerator overnight before serving.
- → What can I substitute for the chocolate sandwich cookies?
If you don't have chocolate sandwich cookies, you can use graham crackers with 2-3 tablespoons of cocoa powder added, or chocolate graham crackers. Adjust the melted butter as needed to achieve the right consistency for the crust.
- → Can I use crunchy peanut butter instead of creamy?
While creamy peanut butter provides the smoothest texture, you can substitute crunchy peanut butter if you prefer some texture in your filling. The small peanut pieces will add a nice crunch contrast to the silky filling.
- → How do I get clean slices when cutting the tart?
For clean slices, dip a sharp knife in hot water, wipe it dry, then slice. Repeat this process between each cut. You can also freeze the tart for 15-20 minutes before slicing for even cleaner cuts.
- → Can I make this tart without a tart pan?
Yes! If you don't have a tart pan, you can use a 9-inch springform pan or pie dish instead. The presentation will be slightly different, but the delicious layers and flavors will remain the same.
- → How should I store leftovers?
Store any leftover tart covered in the refrigerator for up to 5 days. You can also cut individual slices, wrap them well, and freeze for up to 1 month. Thaw frozen slices in the refrigerator before serving.