
 Pin it
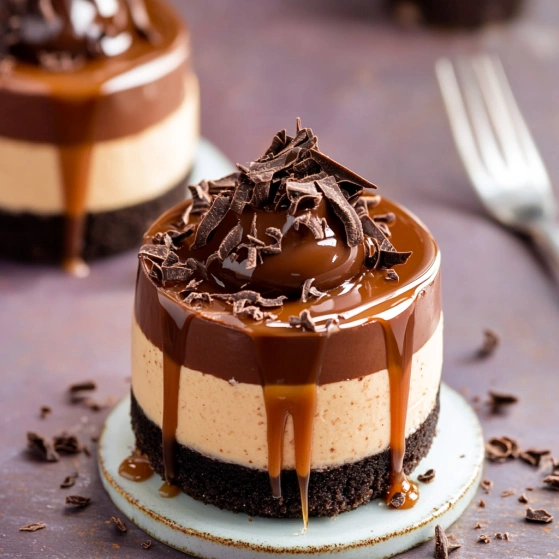
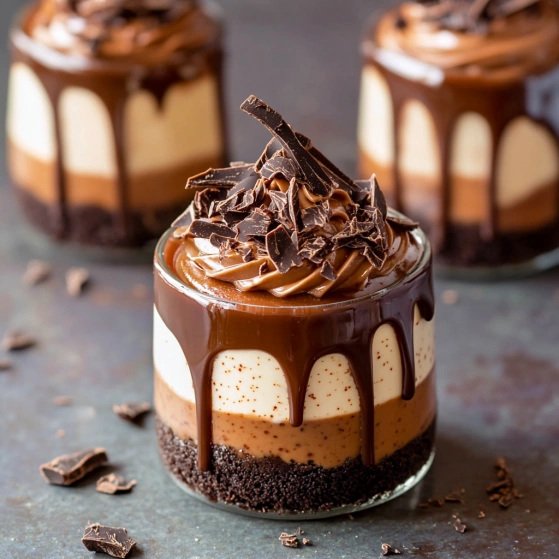
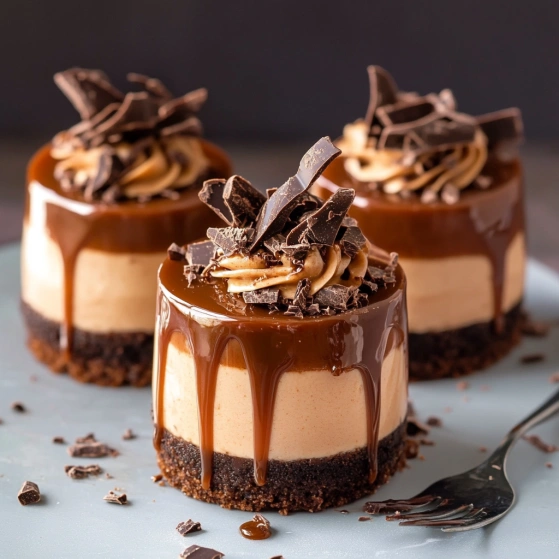
This decadent no-bake chocolate caramel cheesecake combines rich chocolate, smooth cream cheese, and luscious caramel in an easy-to-make parfait style dessert that requires zero oven time. Perfect for summer gatherings or when you need an impressive dessert without the fuss of traditional baking.
I first made these elegant little cheesecakes for a last-minute dinner party when my oven broke down. What started as a kitchen emergency has become my most requested dessert recipe, with friends constantly asking for the "fancy restaurant dessert" that actually takes less effort than a traditional cheesecake.
Ingredients
- Chocolate cookies: Provide the perfect crunchy base with deep cocoa flavor. Use cookies with minimal filling for best results
- Butter: Binds the cookie crumbs together and adds a rich buttery undertone to the base
- Dark chocolate: Delivers intense chocolate flavor and balances the sweetness. Look for 60 to 70% cocoa content for best results
- Milk chocolate: Adds creamy sweetness that complements the dark chocolate. Choose a good quality brand for smoothest melting
- Full fat cream cheese: Creates that signature cheesecake tanginess. Must be at room temperature to prevent lumps
- Whipping cream: Lightens the texture and creates a mousse-like consistency. Ensure it is very cold before whipping
- Caramel sauce: Provides sweet gooey layers and decorative drips. Store-bought works perfectly, but homemade elevates it further
Step-by-Step Instructions
- Prepare the cookie base:
- Process chocolate cookies until they form fine crumbs with no large chunks remaining. Mix thoroughly with melted butter until every crumb is moistened. The mixture should hold together when pressed but still remain slightly crumbly. This creates the perfect textural contrast to the creamy filling.
- Create the base layer:
- Spoon 1 to 2 tablespoons of cookie mixture into each serving glass. Press firmly with the back of a spoon or a coffee tamper to create a compact, even layer. Proper compression prevents a crumbly mess when serving. Refrigerate glasses to help the bases set while preparing other components.
- Add decorative caramel drips:
- Warm a portion of caramel sauce until just pourable but not hot. Transfer to a squeeze bottle or piping bag with a small round tip. Position the tip against the inside upper edge of each glass and apply gentle pressure, allowing gravity to create natural drips down the sides. Connect drips with a thin line of caramel along the rim if desired. Return glasses to refrigerator to set the drips.
- Prepare the chocolate mixture:
- Melt both chocolates together in the microwave using 30-second intervals at medium power, stirring between each interval. Stop heating when most chocolate is melted and stir until completely smooth. Allow to cool slightly so it will not melt the cream cheese when combined. The cooling prevents the mixture from becoming grainy.
- Mix the cheesecake filling:
- Beat room temperature cream cheese until completely smooth with no lumps. Incorporate the melted chocolate mixture and 1/4 cup of caramel sauce until fully blended. The mixture should be uniform in color with no streaks of cream cheese visible. Patience at this stage ensures silky smooth results.
- Incorporate whipped cream:
- Whip cold cream to stiff peaks stage where it holds its shape but still looks glossy, not dry or grainy. Fold one third of the whipped cream into the chocolate cream cheese mixture to lighten it, then gently fold in remaining whipped cream using a large spatula with a cutting and folding motion. This preserves the air bubbles for a light, mousse-like texture.
- Assemble the cheesecakes:
- Layer the chocolate cheesecake mixture into glasses, alternating with drizzles of caramel sauce and sprinkles of reserved cookie crumbs. Create as many layers as your serving glasses allow, finishing with a decorative swirl of the cheesecake mixture on top. This building of layers creates visual appeal and ensures every bite contains multiple flavors and textures.
- Add final decorations:
- Crown each dessert with a final drizzle of caramel sauce and a sprinkle of chocolate shavings, cookie crumbs, or other decorative elements. These finishing touches elevate the presentation from homemade to restaurant quality. The contrast of textures and colors makes each serving visually stunning.
- Chill before serving:
- Refrigerate assembled cheesecakes for at least 20-30 minutes to allow flavors to meld and textures to set properly. This brief chilling firms up the dessert for cleaner spoonfuls and more defined layers when served. However, they are still delicious if eaten immediately.
 Pin it
The caramel drip technique transformed how I approach dessert presentation. The first time I made these for my sister's birthday, she thought I had ordered them from a bakery. That moment of pride when revealing I made them myself has me adding those dramatic drips to practically everything I can now. The contrast between the dark glass, golden caramel, and chocolate filling creates such a stunning visual impact.
Make Ahead and Storage
These cheesecakes actually improve with a bit of time in the refrigerator as the flavors meld together more harmoniously. You can make them up to 48 hours before serving. Simply cover individual glasses with plastic wrap or place in an airtight container in the refrigerator. The cookie base will soften slightly over time but many people prefer this pudding-like texture.
For longer storage, these cheesecakes freeze exceptionally well. Place them in individual freezer-safe containers with tight-fitting lids and freeze for up to three months. When ready to serve, transfer to the refrigerator the night before to thaw gradually. The texture remains nearly identical to freshly made versions, making these perfect for emergency dessert situations.
 Pin it
Variations and Substitutions
While chocolate cookies create the classic base, graham crackers, digestive biscuits, or even ginger cookies work beautifully for different flavor profiles. For gluten-free guests, gluten-free cookies or a simple nut and date crust can be substituted.
The chocolate combination can be adjusted to suit your preference. Use all dark chocolate for a more intense flavor or all milk chocolate for a sweeter, more kid-friendly version. White chocolate pairs wonderfully with fruit additions like raspberry or passion fruit.
For those who prefer less sweetness, substitute a portion of the caramel with coffee or espresso for a mocha variation. Coffee enhances the chocolate flavor while cutting through some of the richness. A splash of liqueur like Baileys or Kahlúa adds sophistication for adult gatherings.
Serving Suggestions
These individual cheesecakes shine when presented on a dessert board with complementary elements. Serve alongside fresh berries, additional caramel sauce for dipping, and chocolate covered espresso beans for an elegant dessert platter.
For summer entertaining, prepare smaller portions in shot glasses or mini dessert cups. This creates a perfect two-bite dessert that guests can enjoy while mingling. The smaller size also allows for offering multiple dessert options without overwhelming guests.
For a more substantial plated dessert, accompany each cheesecake with a small scoop of vanilla bean ice cream and a delicate chocolate garnish. The temperature contrast between the cold cheesecake and the melting ice cream creates a delightful sensory experience.
Frequently Asked Questions
- → Can I make these cheesecakes ahead of time?
Yes, these chocolate caramel cheesecakes can be made 2-3 days ahead. Store individual glasses covered with plastic wrap in the refrigerator, or place in an airtight container. They can also be frozen for longer storage - simply thaw for about an hour before serving.
- → What can I substitute for chocolate cookies in the crust?
Graham crackers, digestive biscuits, or Oreos (with filling removed) make excellent substitutes for the chocolate cookies in the base. Just ensure they're crushed finely and mixed well with the melted butter to achieve the right consistency.
- → How do I achieve the perfect caramel drip effect?
For the caramel drip, warm the sauce until it's just pourable but not runny. Transfer to a squeeze bottle or piping bag with a small round tip. Hold the tip against the inside edge of the glass and gently squeeze until the caramel begins to drip down naturally. Refrigerate immediately after to set the drips in place.
- → Can I use store-bought caramel sauce?
Absolutely! Store-bought caramel sauce works perfectly in this dessert. Choose a thick, high-quality caramel for best results. Dulce de leche can also be substituted for a similar but slightly different flavor profile.
- → What's the best way to serve these cheesecakes?
Serve these cheesecakes chilled but not frozen. Remove from the refrigerator about 10-15 minutes before serving to allow the flavors to develop. Add a fresh garnish like chocolate shavings, a mint leaf, or a small cookie just before serving for an extra special presentation.
- → Can I make this as one large cheesecake instead of individual servings?
Yes, this recipe can be adapted to make one large no-bake cheesecake. Use a springform pan lined with plastic wrap or parchment paper for easy removal. The assembly process remains the same, but you may need to increase chilling time to 3-4 hours to ensure it sets properly.