
 Pin it
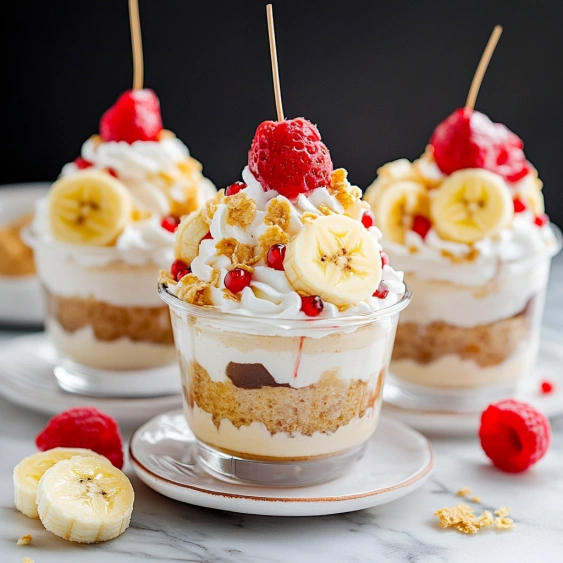
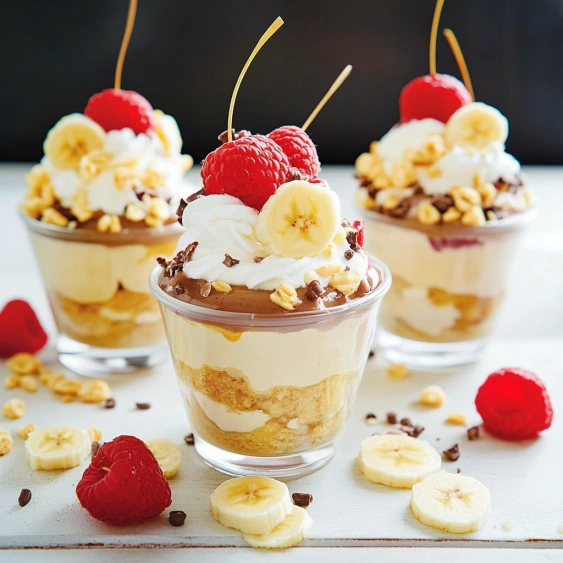
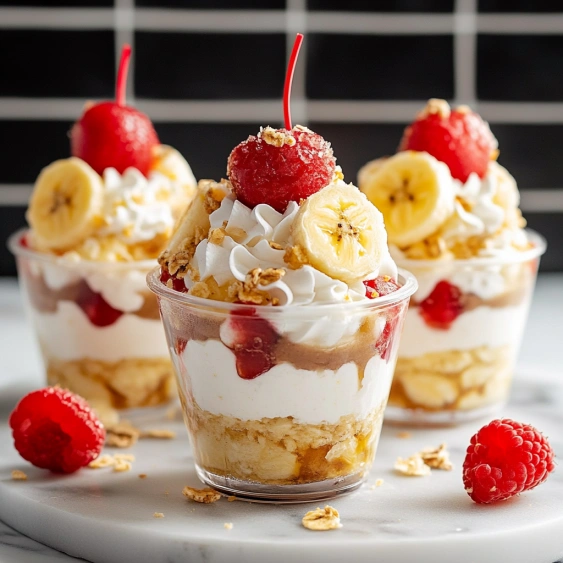
This delightful banana split pudding cups recipe transforms the classic ice cream parlor favorite into an easy-to-make, no-bake dessert that's perfect for family gatherings or make-ahead treats. The layers of creamy pudding, fresh fruit, and whipped topping create a stunning dessert that tastes just like a banana split but can be prepared in advance and served in individual portions.
I first made these for my daughter's birthday party when I needed a quick dessert that would impress without keeping me in the kitchen all day. The kids went wild for these colorful cups, and now they're requested at nearly every family gathering we host.
Ingredients
- Banana instant pudding mix: delivers authentic banana flavor without having to wait for bananas to ripen
- Chocolate instant pudding mix: creates the perfect contrasting layer and mimics the chocolate sauce in a traditional banana split
- Cold milk: activates the pudding mix properly for the best texture
- Whipped topping: keeps the dessert light and airy while adding creaminess
- Fresh strawberries: provide bright color and tangy sweetness that balances the creamy elements
- Banana slices: give authentic banana split flavor and fresh texture
- Crushed pineapple: adds tropical sweetness and juice for an authentic banana split experience
- Maraschino cherries: create that classic banana split look everyone recognizes
- Crushed peanuts: add delightful crunch and nutty flavor
- Sprinkles: bring fun color and festive appearance to the dessert
Step-by-Step Instructions
- Prepare banana pudding:
- Whisk together half a package of banana pudding mix with 1 cup of cold milk until completely smooth with no lumps remaining. The vigorous whisking incorporates air for a lighter texture.
- Prepare chocolate pudding:
- In a separate bowl, repeat the same process with half a package of chocolate pudding mix and the remaining cup of cold milk. Make sure to whisk for at least 2 minutes to activate the thickening agents.
- Chill pudding mixtures:
- Place both bowls in the refrigerator for 5 minutes to allow the puddings to set slightly. This brief chilling helps the puddings reach the perfect consistency for layering.
- Prepare pudding mixtures:
- Reserve 1 cup of whipped topping for the final garnish. Divide the remaining whipped topping in half, and gently fold one portion into the banana pudding until just combined. The key is to maintain lightness with gentle folding motions.
- Complete chocolate pudding:
- Fold the other half of the remaining whipped topping into the chocolate pudding mixture using the same gentle technique to maintain airiness.
- Create first layer:
- Divide the banana pudding mixture evenly among 8 serving cups, creating the first layer of your dessert. Use about 2 tablespoons per cup for consistent layers.
- Add strawberry layer:
- Spoon diced strawberries over the banana pudding layer in each cup, creating a vibrant red layer that adds freshness and color contrast.
- Add chocolate layer:
- Divide the chocolate pudding mixture evenly among the cups, carefully spooning it over the strawberry layer to maintain distinct layers.
- Add fruit layers:
- Place sliced banana pieces around the edge of each cup, then add a spoonful of well-drained crushed pineapple to each cup. The careful placement of banana slices around the perimeter allows them to be visible from the outside.
- Add whipped topping:
- Top each cup with a generous dollop of the reserved whipped topping, creating a white cloud-like finish that mimics ice cream.
- Chill and serve:
- Refrigerate the completed cups until ready to serve, at least 1 hour for best flavor melding. Just before serving, garnish with maraschino cherries, crushed peanuts, and colorful sprinkles for that authentic banana split appearance.
 Pin it
My family goes crazy for these pudding cups, especially when I use chocolate sprinkles that my grandmother always kept in her pantry specifically for ice cream treats. Something about that nostalgic combination of banana, chocolate and strawberry takes everyone back to childhood ice cream parlor visits.
Make Ahead Tips
These banana split pudding cups can be assembled up to 24 hours before serving. For the freshest presentation, wait to add the final toppings like cherries, nuts and sprinkles until just before serving. Cover each cup individually with plastic wrap, pressing it directly onto the whipped topping to prevent it from drying out in the refrigerator.
Ingredient Substitutions
If you prefer to make this dessert lighter, you can substitute sugar-free pudding mixes and light whipped topping without compromising on flavor. For a dairy-free version, use almond or coconut milk and dairy-free whipped topping. The pudding may not set quite as firmly but will still be delicious. Fresh fruit can be swapped based on what's in season – try blueberries or raspberries instead of strawberries for a different flavor profile.
Serving Suggestions
These banana split pudding cups make a wonderful addition to any dessert table or buffet. For an interactive dessert experience, set up a topping bar with various options like different types of sprinkles, chopped nuts, chocolate chips, and fruit so everyone can customize their cup. They're perfect for baby showers, birthday parties, or summer gatherings where a cool, no-bake dessert is appreciated.
Cultural Context
The banana split was invented in 1904 by David Strickler, a 23-year-old apprentice pharmacist in Latrobe, Pennsylvania, who enjoyed creating new sundaes at the store's soda fountain. The original banana split was served in a long dish called a "boat" with a banana split lengthwise, three scoops of ice cream, and various toppings including whipped cream, nuts, and cherries. This pudding cup version honors that tradition in an accessible, modern format that doesn't require ice cream.
 Pin it
Frequently Asked Questions
- → Can I make these banana split pudding cups ahead of time?
Yes! These pudding cups can be prepared up to 24 hours in advance. Just hold off on adding the final toppings (cherries, nuts, and sprinkles) until right before serving to maintain their freshness and appearance.
- → How long do these pudding cups stay fresh?
When stored properly in the refrigerator, these banana split pudding cups will stay fresh for up to 3 days. The banana slices may darken slightly after the first day, but they'll still taste delicious.
- → Can I use sugar-free pudding mix?
Absolutely! Sugar-free instant pudding mix works perfectly in this dessert. Just follow the same instructions, and you'll have a lighter version of these tasty treats.
- → What can I use instead of crushed pineapple?
If you don't have or don't prefer crushed pineapple, you can substitute with diced mango, peaches, or even mandarin orange segments. Just make sure any substitutes are well-drained to avoid making the dessert too watery.
- → Are there any dairy-free alternatives for this dessert?
Yes, you can make dairy-free versions by using plant-based milk (like almond or coconut milk) and dairy-free whipped topping. Just be sure to check that your instant pudding mix works with non-dairy milk, as some formulations may not set properly.
- → What size cups work best for this dessert?
8-ounce clear plastic cups or small glass dessert dishes work best for these pudding cups. They provide enough room for all the delicious layers while still being an appropriate individual serving size.