
 Pin it
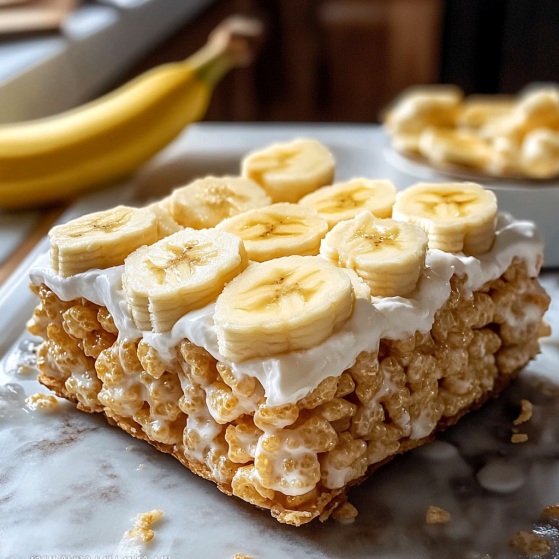
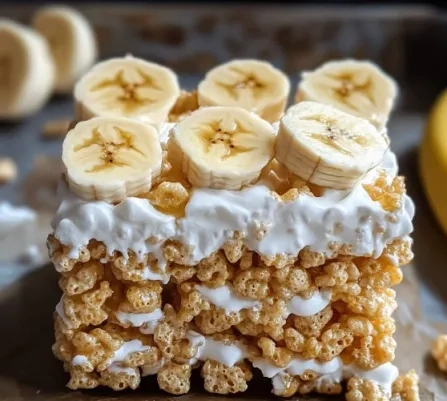
These Banana Pudding Rice Krispie Treats transform the classic childhood snack into a creamy, banana-infused delight that captures the essence of banana pudding in every bite. The familiar crispy texture gets a sophisticated upgrade with the addition of real banana pudding and crushed vanilla wafers, creating layers of flavor that will remind you of traditional Southern banana pudding dessert, but in a convenient, hand-held form.
I made these for my sister's birthday gathering last weekend, and they disappeared faster than any other dessert on the table. Even my brother-in-law, who claims he doesn't have a sweet tooth, asked for the recipe.
Ingredients
- 8 tablespoons butter: Use unsalted butter for better control of saltiness. The butter should be at room temperature for even melting and provides that rich, buttery foundation that makes Rice Krispie treats so irresistible.
- 6 cups Rice Krispies cereal: The classic choice, but you can substitute with other crispy rice cereals. Fresh cereal ensures the perfect snap and crunch in every bite.
- 6 ½ cups mini marshmallows (divided): Mini marshmallows melt more evenly than large ones. Setting aside 1½ cups to fold in later creates delightful pockets of gooey marshmallow throughout the treats.
- 1 cup crushed vanilla wafers: Look for Nilla Wafers or similar brands. Crushing them yourself allows for control over texture - some larger pieces add interest and authenticity to the banana pudding experience.
- 1/4 cup banana pudding mixture: Prepared from instant mix according to package directions. This is the secret ingredient that infuses authentic banana flavor throughout.
- 1 teaspoon vanilla extract: Use pure rather than imitation for the best flavor. It enhances the banana notes and adds depth.
- Toppings: Extra crushed vanilla wafers, marshmallow fluff, and white chocolate - These finishing touches add visual appeal and flavor complexity that elevates these treats beyond the ordinary.
Step-by-Step Instructions
- Step 1:
- Make the instant banana pudding according to the package directions, typically whisking the powder with cold milk. Set it aside to thicken until it reaches pudding consistency, usually about 5 minutes. You want it thick enough to incorporate without making your mixture too wet, but not so firm that it won't blend smoothly with the marshmallow mixture.
- Step 2:
- In a large, heavy-bottomed saucepan, melt the butter over medium-low heat, swirling occasionally to ensure it melts evenly without browning. The butter should be completely melted but not sizzling or browning at the edges, which would alter the flavor.
- Step 3:
- Add 5 cups of mini marshmallows to the melted butter. Reduce heat to low and stir continuously with a wooden spoon or heat-resistant silicone spatula. Keep stirring until the marshmallows are completely melted and the mixture is smooth and glossy with no visible lumps, approximately 3-4 minutes. Patience is key here – rushing with higher heat can cause scorching.
- Step 4:
- Remove the pan from the heat. Immediately stir in the vanilla extract and the prepared banana pudding. Mix vigorously until the pudding is fully incorporated and no yellow streaks remain. The mixture should be uniform in color and texture. Work quickly as the mixture will start to set as it cools.
- Step 5:
- Working swiftly, fold in the Rice Krispies cereal, the reserved 1½ cups of mini marshmallows, and the crushed vanilla wafers. Use a folding motion rather than stirring to preserve the cereal's crispness and prevent the mixture from becoming too dense. Continue until everything is evenly coated with the marshmallow mixture, with no dry cereal visible.
- Step 6:
- Line a 9x13-inch baking dish with parchment paper, leaving overhang on the sides for easy removal. Transfer the mixture to the prepared dish. Using a piece of parchment paper or silicone spatula lightly coated with cooking spray, gently press the mixture into an even layer. Apply just enough pressure to ensure cohesion without compacting the treats, which would make them too dense.
- Step 7:
- While the mixture is still warm, spread a thin, even layer of marshmallow fluff over the top. Sprinkle generously with additional crushed vanilla wafers, pressing lightly to adhere to the fluff. The warmth from the treats will help the toppings stick without extra pressing.
- Step 8:
- Melt white chocolate chips or chopped white chocolate in a microwave-safe bowl in 20-second intervals, stirring between each until completely smooth. Transfer to a small ziplock bag, snip a tiny corner, and drizzle artistically over the treats. The white chocolate adds visual appeal and a sweet counterpoint to the banana flavor.
- Step 9:
- Allow the treats to cool completely at room temperature, about 1-2 hours, or speed up the process by refrigerating for 30 minutes. Once set, use the parchment paper overhang to lift the entire slab from the pan. Cut into squares using a sharp knife wiped clean between cuts for the neatest presentation.
 Pin it
I've found bananas to be nature's perfect comfort food. When my daughter was recovering from wisdom teeth surgery, these soft-yet-satisfying treats were one of the few desserts she could enjoy. The natural sweetness and familiar flavor were just what she needed to lift her spirits during a painful recovery.
Variations to Try
The basic recipe is wonderful on its own, but don't be afraid to experiment with variations. Try adding dried banana chips for extra banana flavor and textural contrast, or fold in white chocolate chips instead of drizzling them on top for pockets of sweetness throughout. For a more decadent version, consider layering a thin spread of Nutella before adding the marshmallow fluff topping – the chocolate-banana combination is absolutely divine. I've made all these variations for different occasions, and each brings something special to the basic recipe.
Make-Ahead and Storage Tips
These treats are ideal for busy schedules since they can be prepared up to three days in advance. Store them in an airtight container with parchment paper between layers to prevent sticking. For longer storage, these treats freeze surprisingly well for up to three months. Simply wrap individual pieces tightly in plastic wrap, then place in a freezer bag. Thaw at room temperature for about an hour before serving. If they seem a bit firm after storage, 10 seconds in the microwave will restore that perfect chewy texture without melting the toppings.
 Pin it
Perfect for Gatherings
These Banana Pudding Rice Krispie Treats have become my go-to contribution for potlucks and school bake sales. They're sturdy enough to transport without damage, unique enough to stand out among typical dessert offerings, and appeal to both children and adults. I've found they're particularly perfect for outdoor summer gatherings since they don't melt like chocolate desserts and can sit out safely longer than cream-based treats. For special occasions, consider cutting them with cookie cutters into themed shapes or packaging individual squares in cellophane bags tied with ribbon for a charming homemade gift.
Frequently Asked Questions
- → Can I use homemade banana pudding instead of instant mix?
Yes, you can use homemade banana pudding if you prefer, but ensure it is firm and thick before mixing it in.
- → How can I prevent the treats from sticking to my hands when pressing them into the pan?
Lightly grease your hands with butter or use a sheet of parchment paper to press the mixture evenly without sticking.
- → Can I substitute a different cereal for Rice Krispies?
Yes, you can use other puffed cereals, but the texture and flavor may vary slightly.
- → What is the best way to melt white chocolate for the drizzle?
Melt white chocolate in a microwave-safe bowl in 20-second intervals, stirring each time, until smooth and creamy.
- → How should I store these treats to keep them fresh?
Store the Krispie treats in an airtight container at room temperature for up to 3 days. Avoid refrigerating, as it can make them harder.
- → Can I add extra toppings to the treats?
Of course! You can add more crushed wafers, banana chips, colorful sprinkles, or even caramel drizzle for more flavor.