
 Pin it
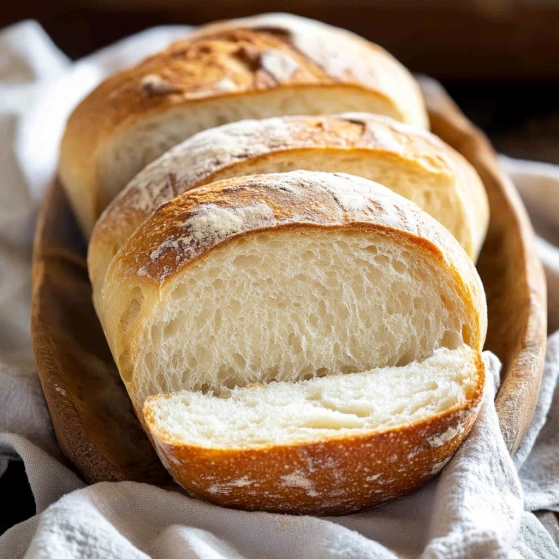
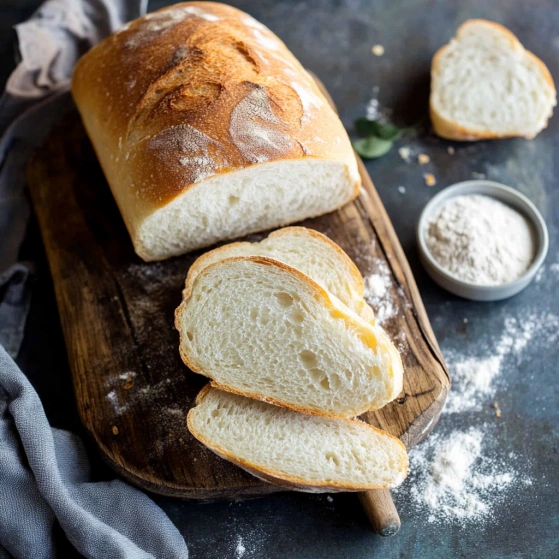
This rustic homemade bread recipe creates two perfect loaves with a golden crust and soft interior that will fill your home with the irresistible aroma of fresh baking. Nothing compares to the satisfaction of pulling your own bread from the oven and enjoying that first warm slice.
I developed this recipe during a snowstorm when we were stuck indoors for days. What began as a necessity quickly turned into our family's weekend tradition. My children now eagerly await Saturday mornings when the kitchen fills with the comforting scent of baking bread.
Ingredients
- Warm water: Between 105-115°F ensures proper yeast activation without killing the yeast cells
- Active dry yeast: Provides the leavening power; choose quality brands for consistent results
- Honey or sugar: Feeds the yeast and adds subtle sweetness; use honey for a more complex flavor
- Salt: Enhances flavor and controls yeast activity; kosher salt works particularly well
- Oil: Adds tenderness and helps extend shelf life; neutral oils like canola work best
- All purpose or bread flour: Provides structure; bread flour creates a chewier texture with higher protein content
Step-by-Step Instructions
- Proof the yeast:
- Combine warm water, yeast, and a pinch of sugar or honey in a large bowl or stand mixer. Allow the mixture to rest for 5-10 minutes until it becomes foamy and bubbly. This crucial step confirms your yeast is active and viable. If no foaming occurs, discard and start fresh with new yeast.
- Create the dough base:
- Add the remaining sugar or honey, salt, oil, and 3 cups of flour to the activated yeast mixture. Mix thoroughly until well combined, which typically takes about 2 minutes. The mixture will still be quite wet at this stage but should show signs of coming together.
- Achieve proper consistency:
- Incorporate another cup of flour and mix well. With mixer running, add additional flour in half-cup increments until the dough begins pulling away from the sides of the bowl. The perfect dough feels smooth and elastic when touched, slightly tacky but not overly sticky. This typically requires between 4 to 5.5 cups of flour total.
- Develop gluten structure:
- Knead the dough for 4-5 minutes using a stand mixer on medium speed or 5-8 minutes by hand on a lightly floured surface. Proper kneading develops gluten, creating the structure needed for excellent bread texture. The dough should feel smooth and spring back when gently poked.
- First rise:
- Place the kneaded dough in a greased bowl, turning once to coat all sides with oil. Cover with a clean kitchen towel or plastic wrap and set in a warm, draft-free location. Allow the dough to rise until doubled in size, approximately 90 minutes. The ideal rising environment is around 75-80°F.
- Shape the loaves:
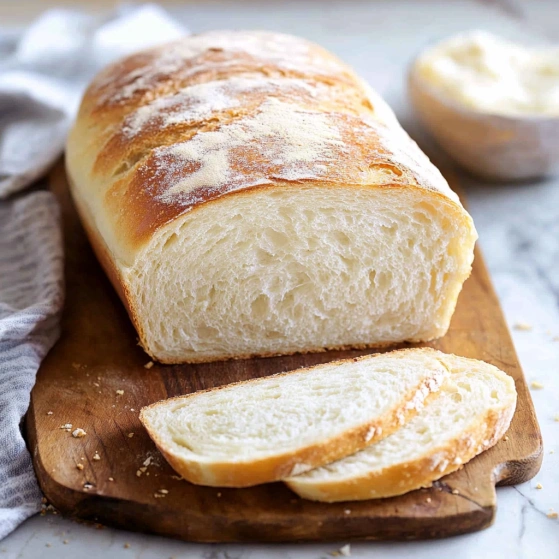
- Prepare two 9x5 inch loaf pans with generous cooking spray. Optional but helpful: line the bottom of each pan with parchment paper. Punch down the risen dough firmly to remove air bubbles, then divide into two equal portions. Shape each portion into a long log and place in prepared pans.
- Second rise:
- Cover the pans with a lightweight towel or greased plastic wrap. Allow the dough to rise again until it crests about 1 inch above the pan edges, approximately 45-60 minutes. This second rise creates the final texture and volume of your bread.
- Bake to perfection:
- Bake in a preheated 350°F oven for 30-33 minutes until the tops develop a beautiful golden brown color. A properly baked loaf sounds hollow when tapped on top. Remove from oven and immediately invert onto cooling racks. Brush the warm tops with butter for extra flavor and a soft crust.
 Pin it
The honey in this recipe is my secret ingredient. While sugar works perfectly well, honey imparts a subtle complexity and helps maintain moisture longer. During summer, I often use honey from our local farmers market, and I swear you can taste the difference. The bread somehow captures the essence of those summer wildflowers.
Troubleshooting Common Issues
Bread baking looks simple, but small factors can significantly impact your results. If your bread doesn't rise properly, check your yeast expiration date and water temperature. Too hot kills yeast while too cool prevents activation. Room temperature ingredients generally produce better results than cold ones.
Another common issue is dense texture. This typically results from insufficient kneading or rising time. Be patient during both rise periods and ensure your kitchen is warm enough. In winter months, I often preheat my oven for just a minute, then turn it off and use it as a draft-free rising spot.
Lastly, proper measuring makes a difference. For best results, use the spoon-and-level method for flour rather than scooping directly with the measuring cup, which compacts flour and can lead to using too much. Even better, use a kitchen scale for precise measurements.
Storage and Freezing
Homemade bread lacks commercial preservatives, making proper storage crucial. Once completely cooled, store in airtight containers or bags at room temperature for 2-3 days. For longer freshness, refrigerate for up to 5 days, though this may slightly alter texture.
For extended storage, this bread freezes beautifully. Allow loaves to cool completely, then wrap tightly in plastic wrap followed by aluminum foil or place in freezer bags. Freeze for up to three months. Thaw at room temperature still wrapped to prevent moisture loss.
To revive slightly stale bread, lightly sprinkle with water and heat in a 350°F oven for 5-10 minutes. This refreshes the crust and softens the interior wonderfully.
 Pin it
Serving Suggestions
This versatile bread complements virtually any meal. Serve warm slices with butter and honey for breakfast, use for sandwiches at lunch, or pair with soups and stews for dinner. The slightly sweet profile makes it excellent for French toast or bread pudding.
For special occasions, transform a loaf into garlic bread by slicing horizontally without cutting through completely, then spreading garlic butter between slices and baking until fragrant. You can also cube day-old bread for homemade croutons or breadcrumbs, ensuring nothing goes to waste.
Frequently Asked Questions
- → How do I know when my bread dough has risen enough?
Your dough has risen enough when it has approximately doubled in size. For the first rise in the bowl, this typically takes about 1.5 hours. During the second rise in the loaf pans, the dough should rise about 1 inch above the rim of the pan, which usually takes 45-60 minutes.
- → Can I substitute whole wheat flour for the all-purpose flour?
Yes, you can substitute some or all of the all-purpose flour with whole wheat flour. For best results, start by replacing just half the all-purpose flour with whole wheat. Keep in mind that whole wheat bread will be denser and may require slightly more liquid or a bit less flour overall.
- → How can I tell when my bread is fully baked?
Your bread is fully baked when the crust is golden brown and the loaf sounds hollow when you tap the bottom. The internal temperature should reach about 190°F (88°C) if you're using a thermometer. Properly baked bread will also easily release from the pan after baking.
- → Can I freeze this bread?
Yes! This bread freezes exceptionally well. Allow the loaves to cool completely, then wrap tightly in plastic wrap followed by aluminum foil or place in a freezer bag. Freeze for up to 3 months. Thaw at room temperature or toast slices directly from frozen.
- → What if my yeast doesn't foam during proofing?
If your yeast doesn't foam during the proofing step, it likely means the yeast is dead or inactive. This could be due to expired yeast or water that was too hot (which kills yeast) or too cold (which won't activate it). You'll need to start over with fresh yeast and make sure your water temperature is between 105-115°F (40-46°C).
- → How can I get a crustier bread?
For a crustier bread, place a shallow pan of water on the bottom rack of your oven while preheating. The steam helps develop a crispier crust. You can also brush the loaves with water before baking, or spray water into the oven (carefully!) during the first few minutes of baking.