
 Pin it
This chicken pot pie transforms ordinary ingredients into a masterpiece of comfort food that's become my go-to dinner for busy weeknights. The flaky puff pastry topping creates the perfect contrast to the rich, creamy filling while saving you the trouble of making a traditional double crust.
The first time I made this pot pie was during a particularly chaotic week when I needed something comforting but didn't have time for complicated recipes. My family devoured it so enthusiastically that it's now in our regular dinner rotation, especially when we need a little comfort food therapy.
Ingredients
- Butter: Creates the base for your roux and adds richness to the filling
- Yellow onion: Provides the aromatic foundation for this classic comfort food
- Garlic cloves: Add depth of flavor that intensifies as it cooks
- Italian seasoning: Brings a perfect herb blend without measuring multiple spices
- Rubbed sage: Adds that distinctive pot pie flavor that makes it taste homemade
- Garlic powder: Intensifies the garlic flavor throughout the sauce
- All purpose flour: Thickens the sauce to the perfect consistency
- Chicken broth: Forms the savory base of your sauce, use low sodium if possible
- Heavy cream: Creates that irresistible richness that makes pot pie comforting
- Frozen peas and carrots: Save prep time while adding color and nutrition
- Rotisserie chicken: Provides perfectly seasoned tender meat without cooking chicken separately
- Puff pastry: Creates a flaky golden topping that's easier than traditional pie crust
- Egg: Gives your pastry that beautiful golden shine when brushed on top
Step-by-Step Instructions
- Preheat Oven:
- Set your oven to 400°F to ensure it reaches the proper temperature while you prepare the filling. This high heat will create that perfectly golden puff pastry.
- Create Flavor Base:
- Melt butter in a large skillet over medium heat until it begins to foam slightly. Add diced onion with salt and pepper, cooking for about 4 minutes until the onions become translucent. This creates your flavor foundation.
- Add Aromatics and Seasonings:
- Introduce minced garlic, Italian seasoning, rubbed sage, and garlic powder to the onions. Cook for exactly 1 minute while stirring constantly. This brief cooking releases the flavors without burning the garlic.
- Make the Roux:
- Sprinkle flour over the mixture and cook for 1 minute while stirring continuously. The mixture will look paste like but will prevent your sauce from having a raw flour taste. This step is crucial for thickening.
- Create the Sauce:
- Pour chicken broth in slowly while stirring to prevent lumps from forming. Use your spoon to scrape any browned bits from the pan bottom these contain concentrated flavor. Add heavy cream and stir until completely incorporated.
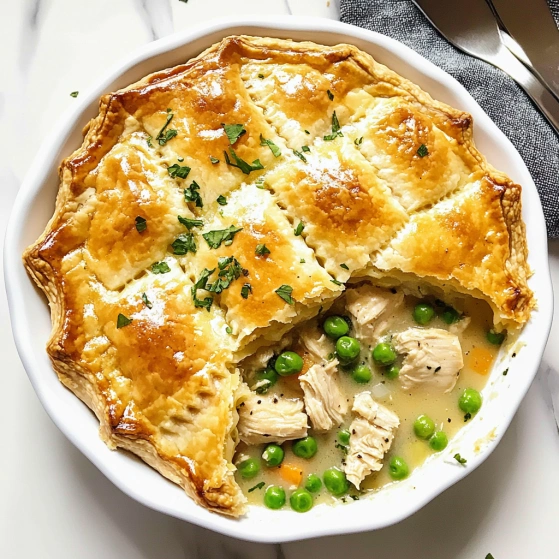
- Add Filling Ingredients:
- Stir in frozen vegetables and shredded chicken. The vegetables will go in frozen no need to thaw. Season generously with salt and pepper to taste the mixture should be slightly more flavorful than you think necessary.
- Thicken the Filling:
- Increase heat to medium high until the mixture begins to bubble gently. Reduce to a simmer and cook for 3 5 minutes, stirring occasionally. The sauce should coat the back of a spoon but still be pourable.
- Transfer to Baking Dish:
- Pour the hot filling into your chosen baking dish. The filling should come about 1 inch from the top of the dish to prevent overflow during baking.
- Prepare Puff Pastry:
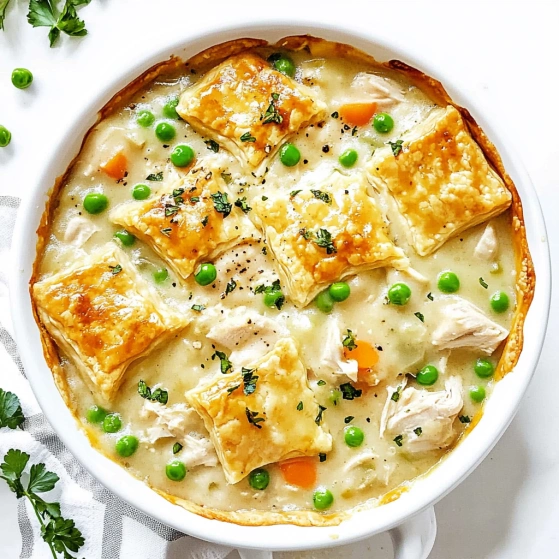
- Unfold thawed puff pastry on a lightly floured surface. Cut into 2 inch squares using a pizza cutter for clean edges. The squares should be uniform in size for even baking.
- Arrange Pastry Topping:
- Layer puff pastry squares over the filling in a slightly overlapping pattern. Start at the edges and work toward the center to ensure complete coverage. This technique creates a beautiful scalloped appearance.
- Apply Egg Wash:
- Beat an egg with a small splash of water until completely combined. Brush this mixture over the pastry squares using a pastry brush, ensuring you cover the entire surface for even browning.
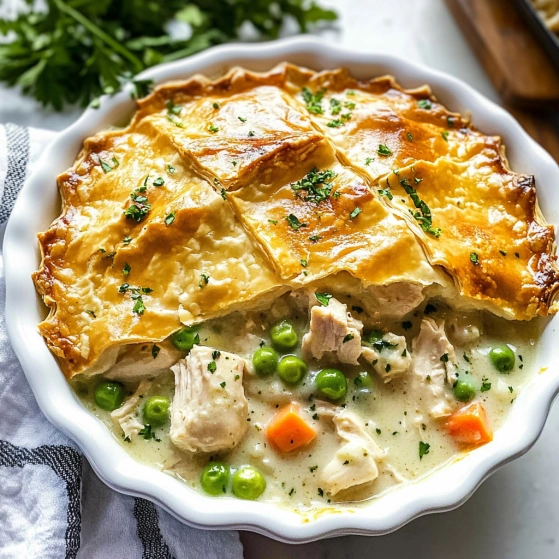
- Bake to Golden Perfection:
- Place the pot pie in the preheated oven and bake for 25 30 minutes. The pastry should puff dramatically and turn a deep golden brown. If browning too quickly, cover loosely with foil.
- Rest Before Serving:
- Allow the finished pot pie to rest for 5 10 minutes before serving. This resting period allows the filling to set slightly so it doesn't run when served.
 Pin it
I particularly love using rotisserie chicken in this recipe not just for convenience but because the seasoned meat adds an extra layer of flavor to the filling. My daughter once declared this better than restaurant pot pie which has become our family's highest culinary compliment.
Make Ahead Options
This pot pie can be assembled completely up to 24 hours before baking. Prepare the filling and transfer to your baking dish, then cover and refrigerate. The next day, cut and arrange the puff pastry, apply egg wash, and bake. You may need to add 5 7 minutes to the baking time if starting with a cold filling. This method actually improves the flavors as they have time to meld overnight.
Simple Substitutions
If you prefer making this recipe with leftover turkey after holidays, simply substitute an equal amount of shredded turkey for the chicken. For a dairy free version, replace butter with olive oil and heavy cream with full fat coconut milk the subtle sweetness works surprisingly well with the savory elements. When fresh herbs are available, replace the dried Italian seasoning with 1 tablespoon fresh thyme and 1 tablespoon fresh rosemary for a brighter flavor profile.
 Pin it
Serving Suggestions
This pot pie stands beautifully on its own as a complete meal, but I like serving it with a simple arugula salad dressed with lemon vinaigrette to cut through the richness. For special occasions, consider individual ramekins for an elegant presentation each person gets their own perfect portion with maximum puff pastry coverage. During fall months, a side of cranberry sauce adds a pleasant tangy contrast that complements the savory filling.
The History Behind Pot Pie
Pot pies have been comfort food staples since ancient Roman times when they enclosed meats in pastry as a preservation method. The American version we recognize today gained popularity in the 1950s when frozen pot pies became widely available. This modern version honors that tradition while elevating it with quality ingredients and the convenience of puff pastry instead of traditional pie crust. The overlapping square technique is actually inspired by traditional Greek spanakopita preparation.
Frequently Asked Questions
- → Can I make this chicken pot pie ahead of time?
Yes! Prepare the filling up to 2 days ahead and refrigerate. When ready to serve, bring the filling to room temperature, top with puff pastry, and bake as directed (may need 5-10 minutes longer if chilled).
- → What can I substitute for rotisserie chicken?
Any cooked chicken works well—poached, roasted, or even leftover turkey. Simply shred or dice about 2 cups of meat. For a quick option, cook 1 pound of chicken breasts or thighs, then shred.
- → Can I use homemade pastry instead of store-bought?
Absolutely! Homemade puff pastry or even regular pie crust works beautifully. If using pie crust, you can either cut it into squares or place the whole sheet on top, making sure to cut vents for steam to escape.
- → How can I make this dairy-free?
Substitute the butter with olive oil or plant-based butter, and replace heavy cream with full-fat coconut milk or your favorite unsweetened plant-based cream. The texture may be slightly different but still delicious.
- → What other vegetables can I add to the filling?
This is very adaptable! Try adding diced potatoes, corn, green beans, mushrooms, or leeks. Just make sure any raw vegetables are sautéed until tender before adding to the sauce.
- → Can I freeze this chicken pot pie?
For best results, freeze before baking. Assemble completely, cover tightly, and freeze for up to 3 months. Bake from frozen at 375°F for about 45-50 minutes until golden and bubbly.